Little Nutty Salad with Roasted Walnut Vinaigrette

Mmmm it’s been a while since I’ve posted a recipe, but I think this recipe will make up for it! If you’re a walnut fan, oh oh oh get ready to fall in love with this salad!

Whenever there’s a salad that is yummy enough to crave, you know it’s good! Because really, who actually likes eating salad…

parks-salad-06

With just a little bit of prep, you can quickly sit down and enjoy this on a warm summer night. It’s perfect with a tall glass of iced-tea!

First, let’s start with the walnuts!

20150724_090053

Make sure to use a non-stick baking sheet to get the syrup to crystallize and break apart, like candy pieces.

I love to cook, but the clean up drives me bonkers, so whatever shortcuts I can use, I totally do. So, since you need to prepare the walnuts two ways,  I cooked the dry walnuts that needed to be roasted for the vinaigrette on one half of a baking sheet, and the candied walnuts on the other.

20150724_090743

Roasted to the left, candied to the right. I can’t pick a side. It’s all sooo good!

As usual, I used more walnuts than the original recipe calls for. I took 1/2 cup of walnuts and spread them out evenly on the baking sheet. These would be roasted for the dressing. Then, I took another 1/2 cup of walnuts, roughly chopped those, and tossed them in a small bowl with about 3 tablespoons of good maple syrup. Just make sure you have enough maple syrup to coat the walnuts, we don’t want the swimming in syrup!

20150724_090648

Put the walnuts into a 350º oven for about 10-15 minutes. Keep checking the walnuts! They go from roasting to burnt very quickly.

The candied walnuts may become a big gloppy piece of sugars, nutty goodness. I treated this in a brittle-like manner, and randomly broke big and small pieces off once it had cooled down on the baking sheet. Put the candied walnuts aside for later.

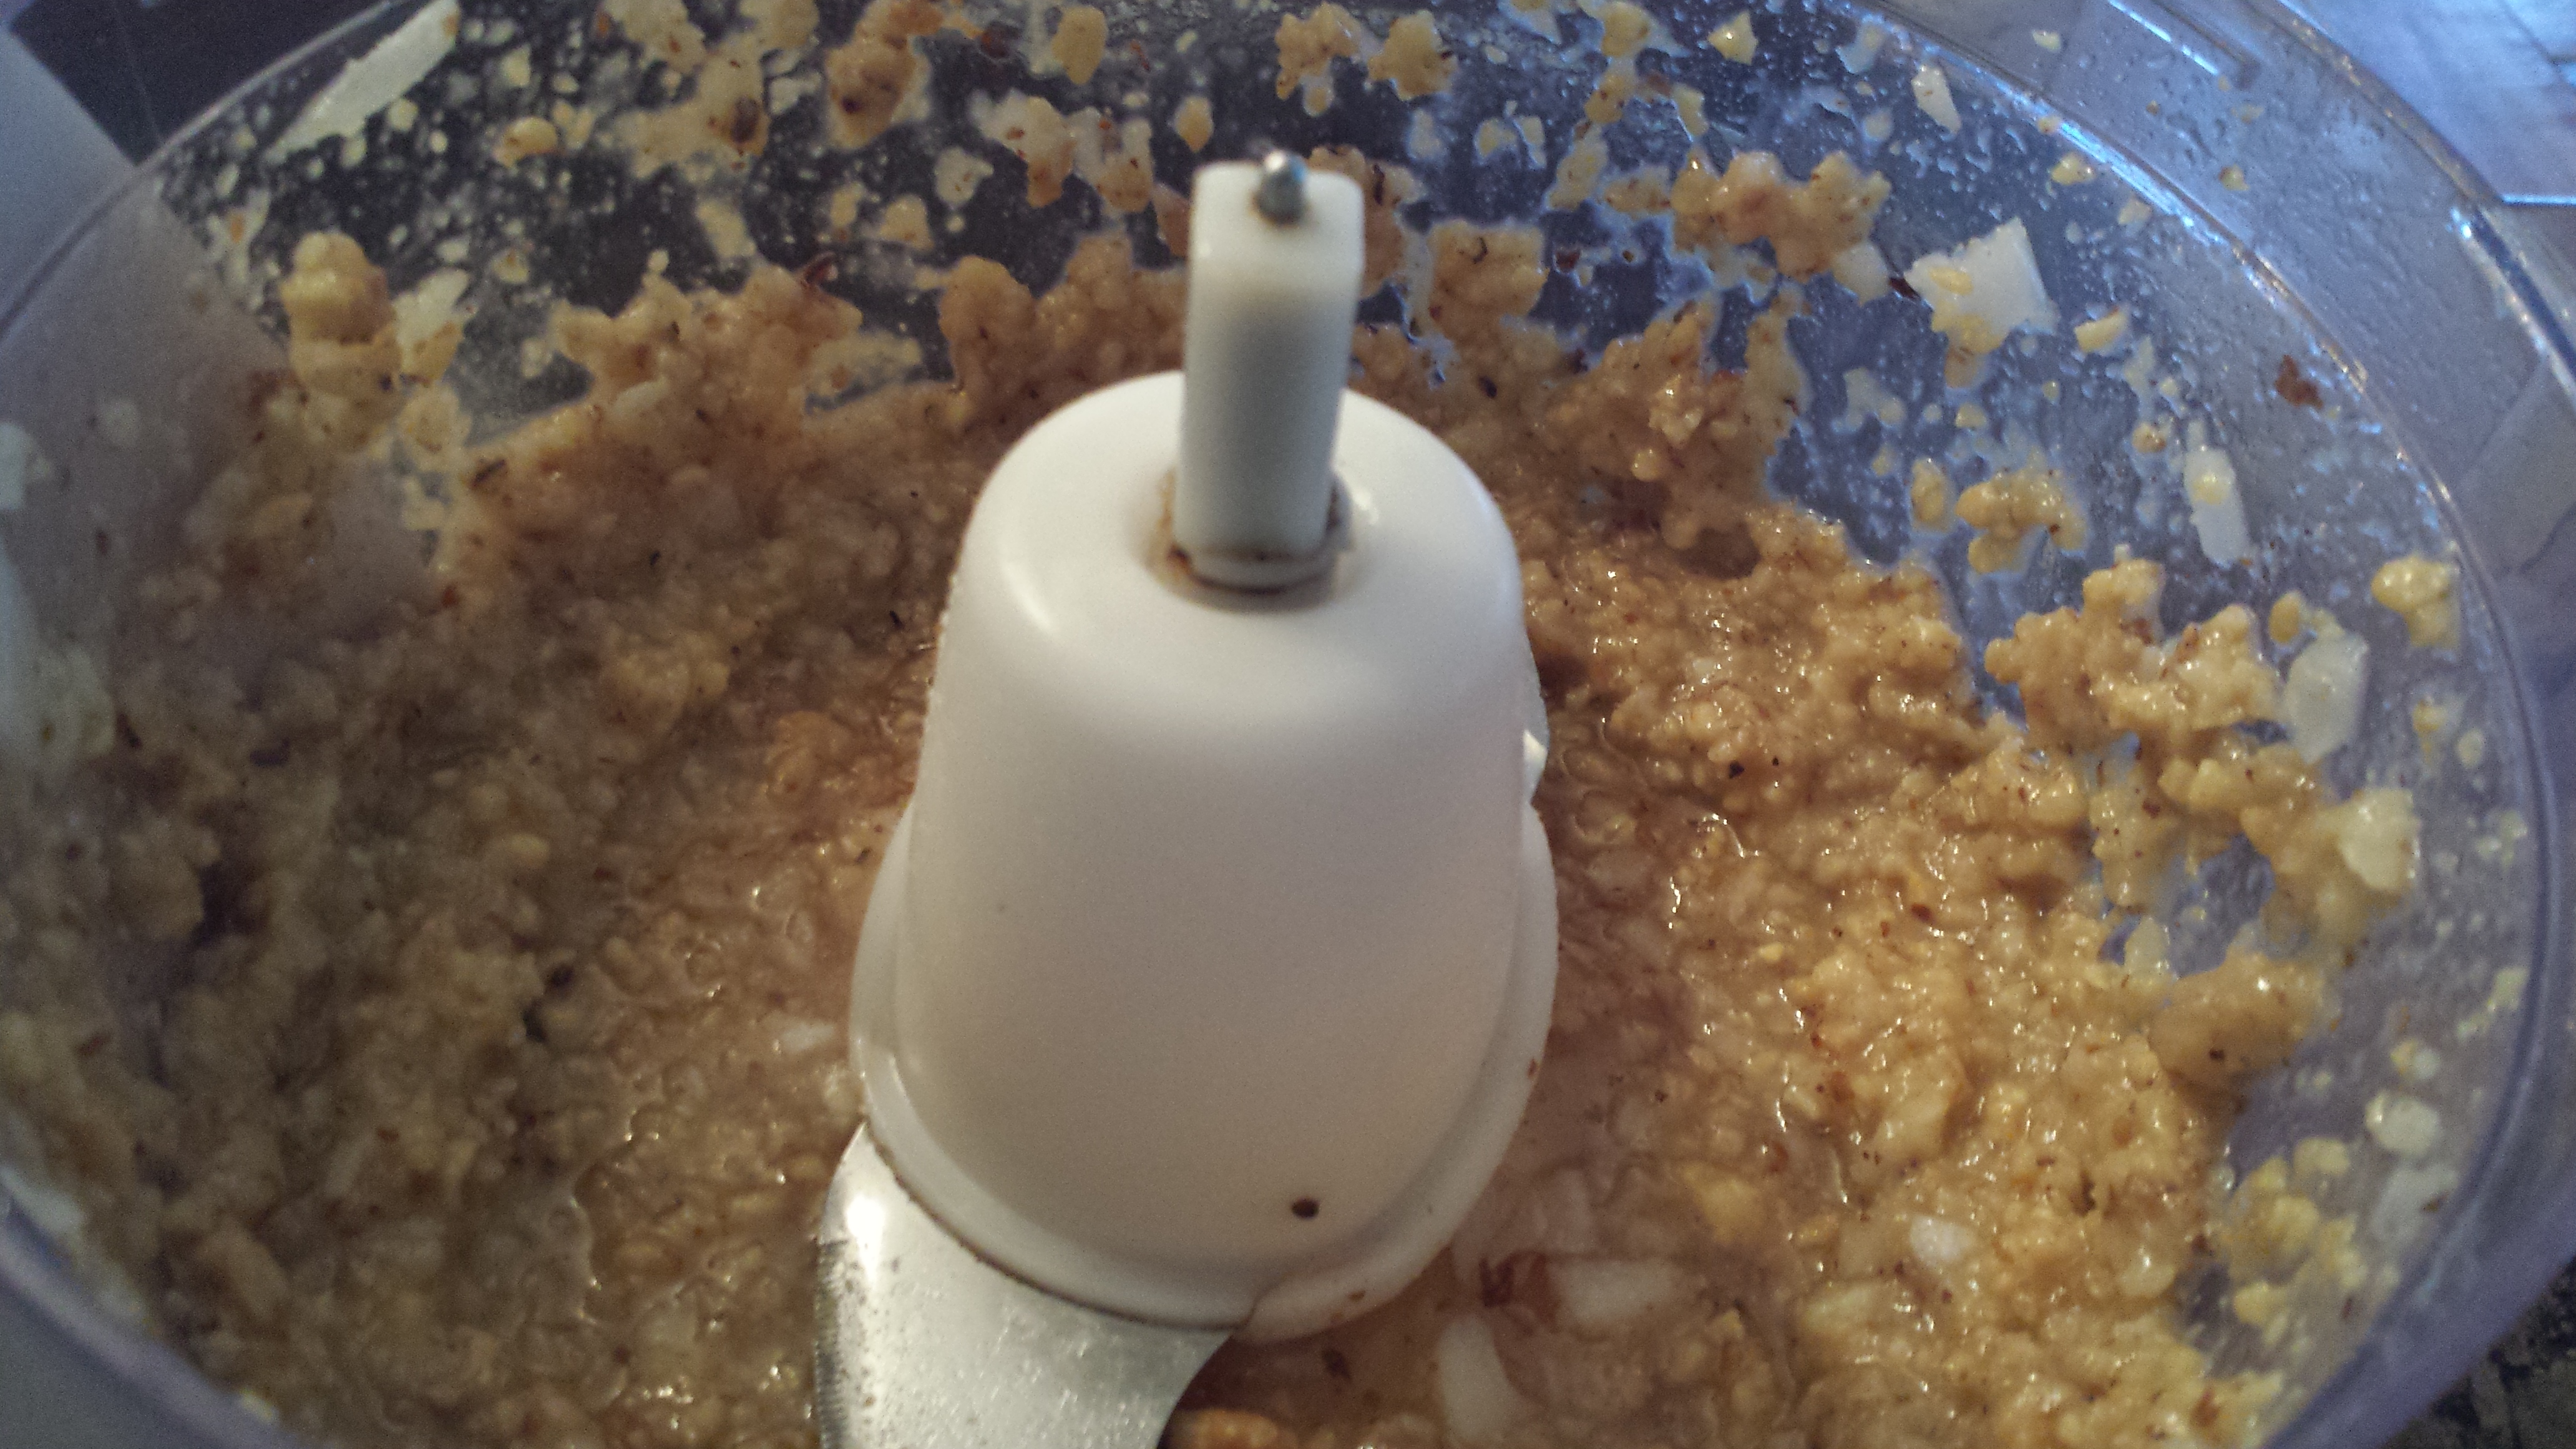
The roasted walnuts are now added into a food processor, along with 1/3 cup honey, 1/4 cup white vinegar, and about 1/4 cup of chopped onion. Pulse these ingredients together until the are thoroughly mixed, and there are no large pieces of walnuts or onions.

20150724_092302

Taste the dressing and adjust. I actually added a little extra onion, even though my first thought was that adding onions would be too strong a flavor. But, if you have a stronger onion, you might want to add less, or maybe you like it sweeter and want to add more honey. It’s really up to you to adjust the dressing at this point, to your liking. Be sure to pulse the vinaigrette each time you make an adjustment.

Once the dressing is to your liking, you want to put the food processor cover back on, and while it’s running, slowly stream the olive oil (about 1/4 cup) in to the mixture through the opening. The vinaigrette should be smooth and a little loose, but not too runny.

20150724_092621

The smell of this vinaigrette is intoxicating!

Now, it’s time to build the salad.

20150724_093956

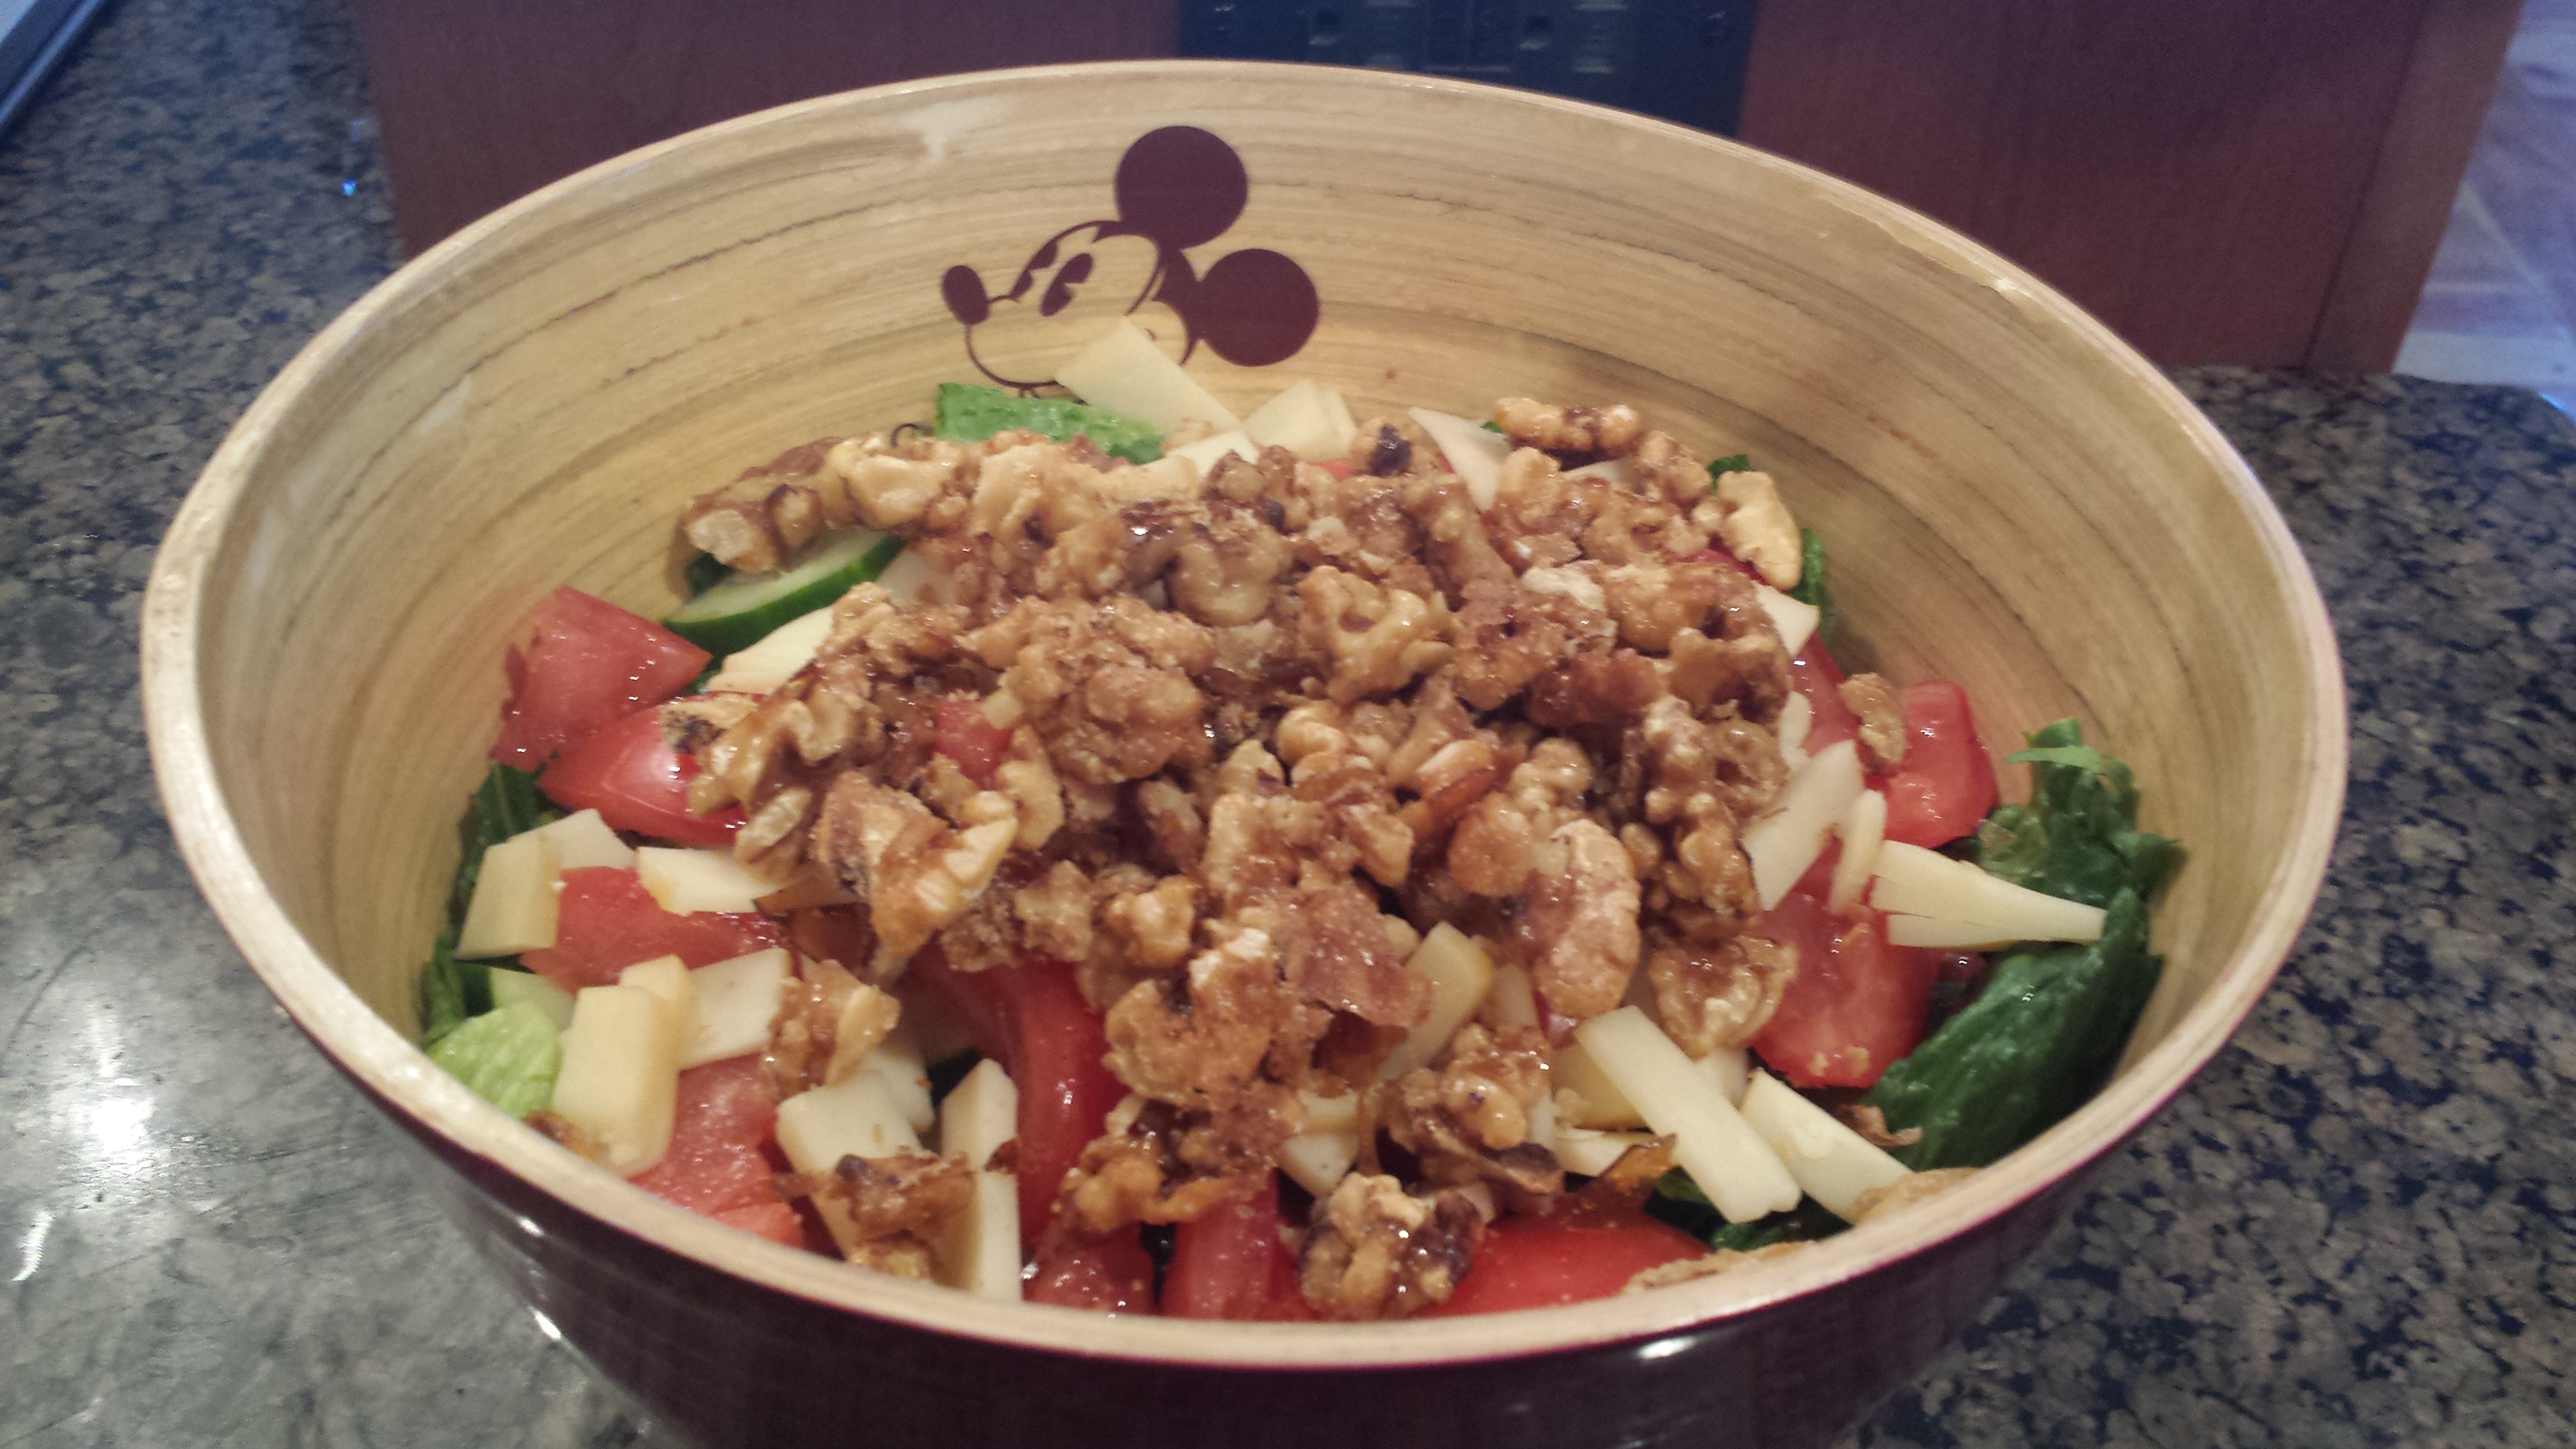
Notice the usual suspects: Romaine lettuce, a cucumber, and a couple of different colored tomatoes.

You can customize this how you like, but I would suggest that you incorporate some wonderful apple-smoked cheddar cheese slices into the salad, whichever brand you like.

The vinaigrette and candied walnuts are sweet, and the vegetables add a crisp, clean taste. But by adding this cheese, you bring in a smoky, deep, tart element, and paired with the above ingredients, it was absolutely heavenly!

If you’re not a cheese fan, I would suggest chopping up some apples, like a tart granny smith or golden delicious.

20150724_095925

And there you have it! This simple, delicious salad is so so so good. I hope that you will try it out. Or, maybe you want to stop by the Whispering Canyon Cafe next time your at the Wilderness Lodge in Walt Disney World, and order it up! You will not be disappointed! 🙂

For the original recipe, click here.

Strawberry Banana Bread

This one’s a winner! It’s an interesting twist on the normal banana bread recipe. By adding the strawberries to the bread, it keeps it moist and sweeter than usual. I was sort of put off by the idea at first, by now I am completely obsessed with this combination! You can enjoy this unique treat at the Wilderness Lodge’s restaurant, Whispering Canyon Cafe – or just make it yourself, it’s very easy!

NOTE: First, let me start by saying that I had to tweak the recipe some. I added vanilla to it, no big deal. But the main problem was the temperature of the oven.

The recipe says to preheat the oven at 325º for one-hour, which I know from baking that it would not be high enough, but I always try and follow the recipe exact the first time. At that temperature, it took the bread nearly 3 hours to bake! My instincts tell me that the bread should be baked at 425º, so next time I will raise it. 

Now, let us begin!

20150318_183453

Start by mixing 1 cup of butter (room temp.) with 2 cups of granulated sugar. While they’re busy mixing and mingling, mash up those bananas. Any “Wiggles” fans here, hm? Mashed banana, mashed banana, *tweet tweet*.

No, just me? Ok…

I used 4 bananas that were just turning brown on the peel. The recipe calls for six, but I only had four and I think there was enough banana flavor.

20150318_185155

Add the mashed bananas to the butter-cream mixture and mix these ingredients together. This is also when I added my tablespoon of vanilla. I mean, how can you go wrong with vanilla?

With the mixture running, add the four eggs in, one at a time, allowing each egg to blend into the banana mixture thoroughly.

Once all of the eggs have been incorporated, remove from the mixer and set aside.

20150318_185839

In a separate bowl, add 3 cups of flour, 2 teaspoons of baking soda, and 1 teaspoon of salt and mix together. Please don’t skip the salt! I know, it sounds weird to add salt to a sweet recipe, but the addition of the strawberries calls for something to balance it out.

Add the flour mixture to the banana mixture, and gently fold the dry into the wet. The bread mixture gets very think, pretty quickly too. It’s a dense mixture.

20150318_190803

Now, you could stop here and have some amazing banana bread. Pretty simple, right? But this is where we add the ingredient that brings the pizzazz.

The recipe calls for 1 1/2 pounds of sliced frozen strawberries that have been thawed out. Well, I accidentally bought whole frozen strawberries, but I don’t think that matters much. Having the whole strawberries inside the bread actually looked pretty cool, and it made the dough around the strawberries chewier, almost with a more cake-like consistency.

***Please make sure that you don’t by the berries in juice or syrup. The bread will never cook with all that liquid.

Add the thawed strawberries to the bread dough and mix gently to incorporate.

20150318_191043

20150318_191217

Beautiful, isn’t it?

Now, divide the dough evenly into two greased 9×5 loaf pans. I like to put the pans onto a baking sheet so that it’s easier to remove from the oven. This is especially useful if your pans are made of glass, like mine are, because those buggers can be really slippery.

Cook for one-hour at my recommended 425º. You’ll know the bread is ready when you stick a toothpick in the middle and it comes out clean.

Always check both breads, though, as they may not cook at exactly the same speed, and Murphy’s Law tells us that if one is not fully cooked, and we have 50/50 odds, we will always check the fully-cooked bread. Yup.

20150318_191524

Believe it or not, but I don’t have a picture of the finished product! My family was so eagerly anticipating the bread, and the intoxicating smell had filled up our home for nearly three hours, so once this bread cooled, it was gobbled up on the spot.

But believe me when I say that the bread as is beautiful as it is unique. You could also make these into awesome muffins, which is my plan for next time. They’re guaranteed to cook quicker and, hopefully, last longer!

Enjoy! jungle book banana

You can check out the original recipe here.


Stir Fried Noodles

Are you a fan of strong flavors? Do you absolutely love peanut butter, and think it can accompany any meal; breakfast, lunch, snack, AND dinner? Like to eat your meal within 20 minutes of starting to cook it?

If you answered yes to all of these craftily pointed questions, then I am pleased to announce that I have found the perfect recipe for YOU! Straight from the beautiful Polynesian Resort’s lovely restaurant, ‘Ohana, I give you their masterful Stir Fried Noodle recipe!

I will admit right off the bat that I did take a couple of shortcuts. They were necessary, and you can feel free to use them. I promise that the flavor was not compromised. All right, let’s get to it!

Stir Fried Noodle Ingredients

First things first, gather your peanut butter sauce ingredients in one happy pile. You will need to chop 2 cloves of garlic, about 1/4 of a Spanish onion (very sweet!), and chop about 1 tablespoon of roasted peanuts.

Note: Chop up an extra tablespoon of roasted peanuts to garnish the dish.

Add those ingredients to a heavy bottom pot, along with 1/2 cup of good, smooth peanut butter and a 1/4 cup of soy sauce, sugar, and water each. Now, let’s address the ginger situation, or Shortcut #1.

ginger

The recipe calls for a chopped piece of ginger (about 2″ long). Up here in the north, we don’t always have ginger, and if we do, it isn’t always fresh. I used to substitute fresh ginger for powder, which does sacrifice the flavor. The ginger was always sort of off, because fresh versus powder is hardly comparable. But one day, the Ginger Gods heard my plea, and to ward off my agony, they delivered the above product to my grocery store. It’s fresh ginger, processed into an easy squeeze tube. I added about 1 tablespoon of this ginger to the pot along with the other sauce ingredients.

Stir Fried Noodle Sauce (2)

Let this mixture boil gently while stirring often. Once it gets to a boil, turn the heat down and let simmer for ten minutes. Now, you could take this sauce, add it to a blender, and puree it til smooth. OR, you can use the most under-rated kitchen tool of our time.

the emulsifier

This is a great tool for mashing potatoes, blended vegetables for cream soup, and now, blending yummy peanut butter sauce! I’m telling you, invest in this. It’s magical.

While you wait for the sauce to boil (trust me, it doesn’t take long at all!), start preparing the noodle part of the dish.

Stir Fried Noodle Veggie

Warm up 2 tablespoons canola/vegetable oil in a wok (or deep saucepan). Slice up 1/2 red pepper into small slices, and an equal amount of pineapple. Add to a wok along with ginger and garlic.

Shortcut #2: The original recipe calls for pureeing the ginger and garlic together, but that’s too much work, and feels unnecessary. I simply squeezed my ginger into the vegetables, and added about a tablespoon of minced garlic.

Once the vegetables have incorporated and the peppers are tender, you can add your udon noodles.

Udon Pack

Again, I was limited to the udon selection at my grocery store, and this caused me to take on Shortcut #3, or instant, fully-cooked noodles. The awesome part of having this around is that since they are cooked, you don’t need to boil water and dirty another pot. So… yay!

Add the noodles to the cooked vegetable mixture. As the package says, I needed to cook this through for 2 minutes. Make sure whatever type of udon noodles you use, that they are cooked and tender before adding the sauce.

Veg and Udon

Once the noodles are done, add your luciously peanut buttery sauce to the wok. Don’t add it all at once. Depending on your own measurements and preference of sauce-to-noodle ratio, I would suggest adding about 1/2 cup of sauce to the noodles first, mix thoroughly, and taste. Remember, you control the quality and quantity of the ingredients, so make it to your liking!

Stir Fried Noodle Complete

Top the final product off with some chopped peanuts, and wa la! Simple, right? Keep this recipe in your back pocket and you will truly impress those foodie friends of yours! Enjoy!

Source

Rigatoni Fiesolana

Who doesn’t love a simple, light pasta dish on warm summer days? This satisfying meal is very easy to make and comes together quickly. I will also share my quick and easy marinara sauce recipe (below), and I guarantee that once you try my recipe, you won’t ever open a jar of sauce again!

To begin, place a large pot of water over high heat to boil. This is usually the longest process! While you wait for the water, start making the Disney Diva’s Fantastic Marina Sauce. You will need:

1. A 28-oz jar of tomato sauce

2. A 14.5-oz jar of fire roasted diced tomatoes

3. 2 tablespoons minced garlic

4. 1 small onion, chopped

5. 1 tablespoon dried parsley, oregano, and thyme

6. 5-7 leaves fresh basil (or 1 tablespoon dried)

7. 1-2 tablespoons sugar; to taste

8. salt and pepper; to taste

Set a saute pan over medium-high set and coat the bottom with olive oil. Finely chop the onion and add to the pan with the minced garlic. Cook together until the onions become soft and translucent. Add the herbs and cook for about 1 minute. Add the tomato sauce and diced tomatoes and stir to combine. Lower heat to medium and let the sauce come to a boil.

20140712_170357

Chop the fresh basil into ribbons and add the to sauce, along with the sugar, salt and pepper. Adjust seasonings as necessary. Let the sauce simmer on low for about 15 minutes.

20140712_170514

While the sauce simmers and gets thicker, start the recipe for the Rigatoni Fiesolana.

First, brown the sausage. I used a 1-pound pack of sweet sausage, but this recipe is super versatile and you could add a mix of sweet and spicy, or even turkey or chicken sausage. The original recipe calls for 1/2 a pound of meat, but I know my family and they are carnivores! This amount did not overwhelm the pasta dish, I actually think that 1/2 a pound is too little.

To brown, add a little olive oil to the bottom of a pot and set to medium-high heat. Get the sausage in the pot and break apart with a wooden spoon. After about 7 minutes, the sausage should be fully cooked. Add about one tablespoon of minced garlic, or two fresh small garlic cloves that have been chopped up very fine. Cook the garlic with the sausage for about one minute, and mix together.

20140712_171744


Next, chop the mushrooms into small diced pieces and add to the sausage mixture. I used two small portobello mushroom caps, but I think next time I will use an 8-oz pack of sliced baby portobellos instead to add more mushrooms to the mixture. Cook until the mushrooms are soft and wilted, or for about 5-7 minutes. Season with salt and pepper.

Add the marinara sauce to the sausage mixture and stir to incorporate. Then, add a handful or so of Parmesan cheese and the best secret ingredient, the heavy cream, to the sauce mixture. It takes the tomato-based sauce and makes it indulgent. You can also use regular light cream or even half-and-half, I’ve done it! 🙂

Watch as the bright red sauce turns into a soft, pinkish color. 20140712_172621 20140712_172649

Doesn’t that just look super fancy! It actually isn’t a heavy sauce, but this trick is good to keep in your back pocket if you’re inviting people over for a pasta dinner. The appearance is key, and they will be expecting a red sauce, so surprise them!

While the yummy sauce and sausage mixture get friendly, lower the heat to medium to bring it to a soft simmer. At this point, the stubborn and always last-to-the-party water should be boiling. Add salt to the water and the rigatoni. Cook until al dente or your preference.

Is there a lovelier site than that of a bowl of pasta?

Is there a lovelier site than that of a bowl of pasta?

TIP: Do not add the pasta to the sauce. The noodles have a tendency to soak up all the sauce, and the next day your leftovers (if there are any!) will be dry. Keep them separated.

Top your pasta with some extra cheese, because why not it’s your dinner, and dive into the surprisingly light yet indulgently tasty meal you have rewarded yourself with! Enjoy!

20140712_174417


This recipe can be enjoyed at Spoodles on the Boardwalk at WDW. For the original recipe, click here.


Peeky Toe Crab Cakes w/ Chili Remoulade

When it’s cold and rainy outside, I like to cook something to transport me away to the beach. And what better to represent a long summer afternoon than yummy crab cakes! This recipe is so good! It gets a little messy, but luckily the set-up is simple enough and the end-result is tasty enough that it doesn’t matter.

To start, make the bread crumbs. You want to have fresh bread crumbs. Now I’m not sure you can buy them anywhere, but it’s super simple to do. I used 8 slices of regular white bread, tore them into slices, and added it to my food processor. Pulse a few times until they break down into a crumb consistency.

20140330_133235 20140330_133257 20140330_133344

Next, get a large mixing bowl and add the crab meat. Make sure when you buy the meat the it isn’t claw meat. I did that one time by accident and was pretty disappointed. You want to see “lump crab meat” on the tin. Grab all of the vegetables and herbs you need, too. You’ll be doing a decent amount of chopping between the crab cakes and the remoulade.

20140330_133548 20140330_133720


Chop up 1/4 large red onion, half of a green, red, and poblano pepper, about 4-5 scallion stalks, and 1 teaspoon of parsley. I then gathered all the vegetables and ran my knife through the bunch. You want the veggies to be very fine. The worst thing is getting a large chunk of onion when you bite into the crab cake!

Once the veggies are chopped up well, add them to the bowl with the crab meat along with the lemon juice, cayenne pepper, mayonnaise, salt, pepper, and bread crumbs. I used more bread crumbs than the two cups the recipe called for, because the mixture was a bit too wet and I was afraid the cakes wouldn’t hold when they were being fried. So I added about 3-3 1/2 cups instead. Trust me, the cakes were still crab-filled and delicious! Plus, it doesn’t take 4 cups of crumbs for the coating, so it would have been a waste anyways.

20140330_135205 20140330_140534

Once the mixture is thoroughly incorporated, set up your dressing station! I had the mixture, then a plate with about 1 cup of flour, then a plate with 4 beaten eggs (though you could probably get away with 3), and last was a bowl of the remaining bread crumbs. I also set up two cooking racks with paper towels underneath to hold the form crab cakes.

20140330_141703

To form the cakes, I found that it was easiest to scoop about two tablespoons of mixture and squeeze slightly to remove any excess moisture you can. It might be a good idea to drain the crab meat previously, but I didn’t think of it until after I was cooking. Then, drop the mixture into the flour, dry your hands, and squeeze a little tighter so that the flour sticks to the surface. When you put the cake in the egg, don’t let it sit. Quickly roll till it’s coated and then drop into the crumbs. Wipe your hands again so that the crumbs don’t stick all over your fingers, and roll the cakes in to crumbs. I actually rolled them in the crumbs, squeezed, and then rolled a second time to make a thicker layer. The mixture is moist so adding more batter is a good idea. Rest the formed cakes onto the cooking rack and repeat.

20140330_145935

The recipe says it makes about 28, and I got 25, close enough! I let the crab cakes sit while I made the super-simple chili remoulade.

To make the remoulade, first mix equal amounts of water and chili powder together and set aside for a few minutes. Then, it’s time to get back to chopping!

20140330_151338

Chop the red onion (a little less than a 1/4 of the onion), the pickles (I used 8 bread and butter slices), capers, parsley, chives, and – most importantly – tarragon! If you’ve never used tarragon, prepare to have your world turned on its side. Tarragon is a licorice-y herb that pairs with seafood in the same perfect manner as rosemary pairs with chicken. Oh yeah, it’s that good. I added extra tarragon to this mixture and it really made a difference. It cuts through the spice of the chili powder and the tartness of the pickles. So good!

Once you’ve done all the chopping, add everything to a bowl along with the chili mixture, mayonnaise, salt, pepper, and the juice of 1/2 a lemon.

20140330_152907

Mix it thoroughly and set it aside so that the flavors can meld together. The chili makes the remoulade a beautiful light red color, and all of the fresh herbs makes this sauce scream summertime!

20140330_153538

Get ready to fry! I warmed up about 1/4 cup of vegetable oil until the oil was very hot. Per the recipe, make sure the oil isn’t smoking. You just want it to be hot. To test out if the oil has come to temperature, flick a very little drop of water into the pan. If the oil is hot, it should crackle.

Once the oil is ready, add 3-4 cakes to the pan. Slightly push the cakes down to flatten if they’re too round. It only takes about two minutes per side to cook, and as you go own, it takes even less time. You might need to turn the heat down as you go. You want the cakes to develop a nice, golden brown crust. Once they’re done, place on a plate that has been lined with paper towels to absorb the excess oil while the next batch cooks. Then move them to a baking sheet to allow the newest batch to dry.

20140330_154917 20140330_155007 20140330_160247

Once they’re all cooked, squeeze some lemon juice over them and some course sea salt. Serve immediately with the remoulade and some lemon. This would go great with some watermelon… or sangria! You’ll be whisked off to the sandy beaches in no time!
20140330_160524

You can enjoy this meal at the Flying Fish Cafe at the Boardwalk. For the original crab cake recipe, click here. And for the chili remoulade, click here.


Chocolate Pretzels

Mmm… when I saw this recipe at allears.net, I knew I had to try it out! What could be better than a chocolate pretzel, and how was that even possible? Well, the name might be a little misleading. It’s not a chocolate-flavored pretzel, bready and gooey as I imagined. This is actually a spin on a pretzel, utilizing a chocolate shortbread cookie type recipe with puff pastry. The look is completely unique. It’s a really fun treat that’s super easy to create!

Whenever I am preparing to bake, I always take out the cold ingredients and let them get to room temperature. So I had the butter, pastry puff, and eggs out for about 20 minutes prior to starting the recipe. When the butter is soft, cream it in a mixer with the powdered sugar and salt. Add the vanilla and mix for about 30 second to one minute more. The mixture will be a pale yellow and very creamy.

20140329_131706

Next, mix the dry ingredients together. The flour, cocoa powder, and baking powder should be sifted together for the most thorough integration and to make the mixture smooth.

20140329_125126

The star dry ingredients! Be careful, the cocoa powder is super powdery and can get all over the place. I recommend filling the bowl with the flour first so the cocoa powder has something to land on.

20140329_125925

Now it’s time to marry the wet and dry ingredients. Let’s show our admiration as they join happily ever after.

20140329_131736

Mix together until they come together to form a smooth batter. In my opinion, the batter seemed a bit dry and I think it could have used some milk. Maybe next time I will add some.

Now your batter should look something like this:

It's pretty thick, that's why I feel adding some milk might be a good idea.

It’s pretty thick, that’s why I feel adding some milk might be a good idea.

Lay the first pastry puff down onto a baking dish or large cutting board. This pastry puff needs to be really cold. Mine had been sitting out from the freezer for about 30 minutes, and it started to get soft right around the time I began using it. I thought I was working fast, but if you might get interrupted it might be best to move the pastry puff to the fridge from the freezer when you begin baking instead of setting it out with the eggs and butter.

Once the first layer is down, start molding the chocolate mixture over it. I tried using a spatula but quickly gave up. Your hands are the best tools. Evenly place about a handful of batter across the pastry puff, the flatten it down to cover the pastry puff completely. Try and make the surface as smooth and even as possible.

20140329_133535

You might end up with some extra batter. As I was forming the chocolate mixture onto the puff, I noticed the pastry was stretching, so I didn’t roll it out per the original recipe. Once all of the batter you can fit is on the first pastry layer, add the second pastry on top.

Best looking sandwich ever!

Best looking sandwich ever!

Cover and refrigerate for at least 30 minutes.

Okay, now comes the fun part. Because I have never made pretzels before, and it was getting difficult shaping the dough AND taking pictures, I enlisted the help of my little sister, who graciously formed the dough and worked on her hand-modeling debut! We take care of each other.

Yay teamwork!

Yay teamwork!


Something I didn’t do but learned for next time; roll out the sandwich! The pastry puff and chocolate mixture didn’t stick to each other, and my strips (which I cut 1/2″ wide as opposed to the 3/4″ wide that the recipe calls for) were very thick, making it difficult to roll. Trust me, roll the dough to about 1″ or maybe even 3/4″ thickness. You’ll have more pretzels but they’ll cook more evenly and be easier to shape.

To make the pretzels, follow these steps:

1. Cut the batter into 1/2″ strips.

20140329_142534

2. Twist the dough together to form a “candy cane” shape. As you twist, slightly stretch the dough as well.

20140329_143035 20140329_143038

3. Roll the dough to get the sections to stick together more and also to make the section longer.

20140329_143043

Note: Your strips should look like this: (fun, right?!)

20140329_143114


4a. Pick up the ends gently, and spin the center so it folds into itself. It’s fun if you can manage it like my sister did, but I couldn’t get it down. For the easier, less flashy route, see step 4b.

20140329_143133

20140329_143132


4b. The easier way! Lay down the section and fold one end over the other, like so;

20140329_143158

5. Then, fold over once more. Then take the ends and bring up to the top center of the circle. It will start to look like a pretzel now.

20140329_143214 20140329_143223

6. Okay! You got your pretzel. Now sprinkle some sugar over the top and add them to a pre-heated 350° oven.

The pretzels will cook for about 15 minutes. They don’t actually expand like I thought they would, but I would keep about 2 inches between each pretzel.

Ta dah!

Ta dah!

Chances are, you probably have these ingredients in your kitchen right now. So try out this recipe. And remember, once your treats are done, grab yourself a nice tall glass of cold milk, sit back, and enjoy!

Chocolate Pretzels can be enjoyed at the Boardwalk Bakery.